

simbuff
-
Posts
202 -
Joined
-
Last visited
Content Type
Profiles
Forums
Events
Gallery
Downloads
Posts posted by simbuff
-
-
Hi There,
you should first use the tab create functions from offsets
there you import the FSUIPC raw offset file and you look to the function you want.
copy the offset to the function (button copy->function)
choose a free number in the lower part. copy the function again using one fo the 4 copy buttons, assign a short name, a category (surfaces, engines, A.P., etc) a signal type (gauge, button, ...) a data type and save the function.
Go again to the configuration of the I/O module and now you sghould see the new function in the menu under the category you assigned the function to.
let me know if this works
-
I've put a link to the chips manufactor on our website (instead of the download of 1 driver)
That should allow you to find the best solution
regards
Simbuff
-
Hi Daryl
Thanks for the nice comments. It's good to know that our attitude indicator behaves axactly like the real one (or at least from a simulator point of view).
As you've seen, the analogue altimeter is now in production
best regards
Mark
-
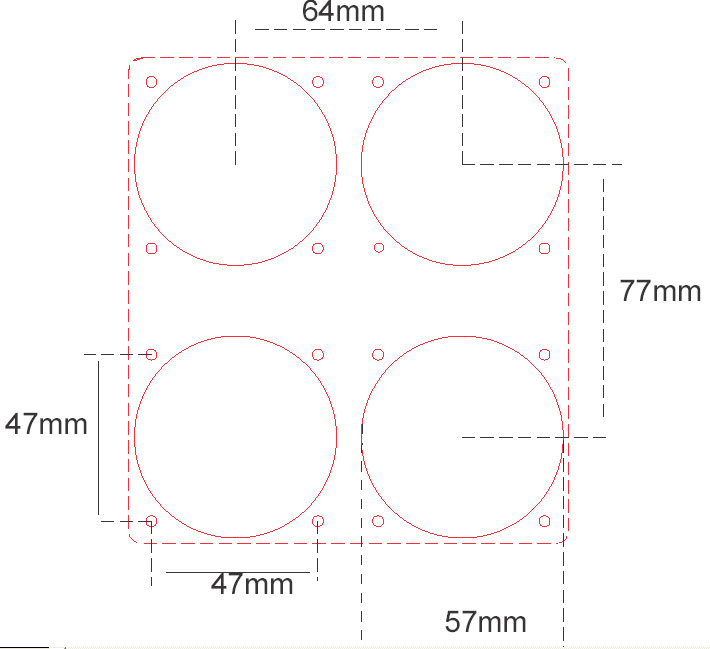
here's the sizing as we used it. I believe those are the same as Simkits anyway.
best regards

-
Hi daryl
The problem is probably the sensor inside the gauge that is bended and does not pass through the electronic eye.
Try to locate the internal needle that has an L shape and that goes through a little black sensor.
It should go trhoug it.
If you don't find it, send me a mail and i'll send you some pictures
best
mark
-
The Boeing Clock and Cessna Clock have a very precise chrystal controlled clock on board and can run stand-alone. This is done to limit the communication load on the interface/bus. Synchronisation of clocks with either PC time or FS time is done when needed.
The PC time and FS is synchronized when Control program is started. On top of that FS time is synchonized when FS is going from Pause to Non-Pause and if a FS Menue is opened or closed.
Clocks must have a separate Gauge ID for that. From version 6.0.4 on this function is improved. In earlier versions a status change in Pause or Menue was sometimes "missed".
new software will be online by the end of week 8 (2009)
simbuff
-
hi Chris,
check if the gauges are making a calibrating noise as you power up.
try hooking up 1 gauge at the time and change the ID number in the configuration screen.
let me know what happens
Simbuff
-
What you should do:
Download the latest software (6.0.2)
If you already have done a full install in the past, you can just install the new executable and the new config file (default.cfg)
Do a new search for gauges and assign your gauges properly
That shoudl solve the problem
best regards
Mark
-
Hi There.
Did you download the latest software? (6.0.2)
did you set the comport in the software at the same nimber as it is in your computer? if you configured comport 4, you should do the same in the software
Are your cables correctly set
Where did you purchase the gauges?
let me know
Bets regards
Simbuff
-
We are testing the new software that speeds up the needle. We'll release it by the end of this week if all goes well
simbuff
-
Hi all,
We will have some kind of setup at lelystad showing all our gauges. Not sure if the cessan setup will be ready, but we will have at least one full setup with all the functional gauges.
And of course we'll show all the other relevant gauges as well. As Simkits will also be there, it'll be easy to compare both technologies.
Best regards and CU all there
Simbuff
-
Holy Crap, here we go again. Of course we believe that our gauges are better, we wouldn't otherwise have started with Flight illusion. But in all honesty I have to admid that I was a customer of Simkits when I started building my pit (so many years ago)
I bought them ready made adn I had almost no trouble running them, even when we started making the engine cluster which ran simultanously with the Simkits gauges.
I'm sure there is a place for everyone, and we at Flight illusion are just offering a solution which we believe is better, because it's digitaly driven, because it's space saving and because the overall look and feel is less "plastic like".
But This forum is not for fighting battles, mearly for helping users to get their gear up and running with no hassle.
Now, as to the original comments of not offering a Cessna set, I have to say you caught us by surprise, since we are busy marketing the full set (including the analogue altimeter which is being developped).
The Idea has always been to sell things that no-one else had. That is, I believe, the true success of Flight Illusion. That is why we started with a true B737 stand-by set (meaning with a digital altimeter) and why we continued to have King Air gauges launched.
Both the B737 and the King Air are the most build cockpit projects. So our clientelle is there.
And with just an IAS and VSI, we would not have dared to compete with Simkits
However, now that we have the Nav gauges, now that we are just short of 1 gauge to offer the same amount of gauges in order to build a full C172 setup, it is comming.
Watch out for our upcomming press release, where the full set will be reveiled. Maybe we'll continue to baffle you...
happy flying (using whatever gauge)
Simbuff
-
You are completely correct about the attitude indicator.
Although the picture on the ordering page shows an adjustment knob, it is delivered without. We should change that picture and we will.
The reason has to be found many years ago, when we started of ith the idea, we thought it would be fairly simple to have an adjustable pitch knob. However, it proved to be very difficult in the actual design to incorporate a working system. Instead of delivering them without, we decided to have a fixed one included.
We will once again look into the matter during our next project meeting.
Let me come back to you later in order to share what was decided.
Best regards
Simbuff
-
hi there,
it seems tha Level D uses a specific offset for the gauge. If you would know the hexadecimal code for the offset number (probably created as a custom gauge) then we could include the offset in list of offsets that are used in the tab "create functions from offset". hence you would be able to use the radio module as such.
It would also allow us to create 767 gauges from our Boeing radio range.
best regards
Simbuff
-
Hi there,
The engine cluster is based on a KA350 panel. The areoworxs is based on a KA200 panel. There might be some differences, but in terms of values, it will works, since we use the same engine return values as does aeroworx.
To say that if the value on the screenpanel forr RPM % is 85, then the value on our cluster will be 85., though the needle position in terms of angle will maybe not correspond; the value will point at 85%
We have many customers who use the aeroworx and none has been complaining.
best regards
mark
Flight illusion
-
Hi guys,
Please try the following procedure.
Power off the interface
Disconnect all gauges except the attitude indicator.
power on and do a search
Check the ID number
Please confirm that the attitdue indicator is doing a calibration turn at power up.
If the AI is recognized, power off again and install the other gauges. Each gauge should have a separate ID numebr.
Let me know how things are going
Simbuff
Flight illusion
-
It all is related to the typical properties of stepper motors. They are very precise, but drawback is the torque they deliver at higher speeds.
The stepper we are using for the Altimeter has a technical limit to 600 degrees per second. As a full needle rotattion points 1000 feet, the maximum the needle can follow is about 1600 feet per second. Alternatively we ca n patch the microprogram by which the needle shows a 10.000 feet on full cicle. That makes a maximum of 16.000 feet per second.
Same for the Attitude indicator. When stepper (most possibly the bankindicator) is driven over its limits it will loose steps and by this the calibration. Forces at high speed are quite high and the product of speed and mass of the pitch and bank mechanism.
Currently the stepper motor driving the bank mechanism has a gear train that is 1:10. By this the bank indicator has 192x10=1920 positions.
Worst case the gear train could be changed which would gain speed, but at the cost of accuracy.
-
Hi Gerry
It seems that there is a documented bug in Vista: http://support.microsoft.com/kb/187553
we'll see whether we can make a work-around for the time being.
But in any case, we need the config file. Please send it to p.leerentveld@chello.nl with some extra information.
best regards
Simbuff
-
for the changing of the ID, try to disconnect all other gauges and just connect the gauge you want to change the ID for.
then search and change it in the configuration screen
let me know if that works
Mark
-
Hi Denis,
The idea of a second setup to change elementary Gauge properties will only work with equal Gauge properties. The basic configuration settings, like Gauge ID, millibar /InchHg are saved in the gauge itself. This is done for efficiency reasons and to reduce overhead in the control program. Within this limitation a dual configuration for Master/Slave will work.
In normal situations the Gauge is configured only once and the settings in the Gauge aren’t read-back from the gauge when re-opening the configuration window for that particular gauge. I agree that can lead to confusion, but that is the way it is currently programmed (for overhead reasons as mentioned before).
So, I advice to toggle the pressure mode and “air pressure effects...” settings , to make sure that the gauge is configured correctly. The latter setting should never be selected. This mode is for non-MS-FS applications.
To check the “Air pressure effects …” : Turning the pressure knob will change the altitude directly. Even when control program isn’t running.
To check the millibar / inHG: depress the air pressure knob for the default values ( 1013 or 29:92)
The test button on the configuration window should result in showing all digits 0-9 in a loop. This must be the case in all modes and if an error or misreading occurs there must be something wrong with the gauge or power.
In a double altimeter config, each one should have its own gauge ID
There is no need to change com port number. This will have no effect on the problem.
In case this doesn’t work please send us both configuration files for analysis.
all the best
Simbuff (Mark)
-
Hi Richard
Thanks for the tip. I have updated the webpage and added the release dates for all downloads. The software version already has a version number.
Happy landings
Simbuff
-
Hi Denis,
we have the normal delivery times of about 5-6 weeks on both gauges. These are standard production.
(both are based on the same electronic circuit board)
best regards
Simbuff
-
Quick reply.
The sound is absolutely normal. It is the sound that the stepper motor makes to go back to the O value (calibrating itself against the internal stopper)
Simbuff
-
Hi Denis,
That's what I meant. You must tick pressure affects altitude and you must be in master mode.
let me know if that helps
Simbuff
Turn & bank coordinator Question
in Flight Illusions Support Forum
Posted
Hi Manny,
The 3D drawing is wrong. But the gauge has the markings to do a standard turn
best regards
Simbuff