

Thomas Richter
-
Posts
1,506 -
Joined
-
Last visited
-
Days Won
26
Content Type
Profiles
Forums
Events
Gallery
Downloads
Posts posted by Thomas Richter
-
-
Hi,
QuoteThis mean the A320NX has the var setted for the output but doesn't well receive input
Do you agree ?
it depends on what they actually use or how. But another important thing is the timing. As Mobiflight uses FSUIPC it has a cycletime for writing and reading Offsets. If you use Mobiflight on a client you have in addition latency. When I'm writing the Offset direct to FSUIPC, in FSUIPC assigned, the log shows 200ms - 650ms between the value and the setback to 0.
QuoteBut in this case i can set the off push button value, only with offset i can set a formula in mobiflight
That does work with SET_AUTOBRAKE_CONTROL = param 1 sending the control via FSUIPC instead of sending the Offset. But that works as well of course correct by sending the SET_AUTOBRAKE_CONTROL = param 1 direct via SimConnect. That must be something setup wrong within Mobiflight.
Thomas
-
Hi,
just to confirm the Offset 0x2F80 (1 Byte) works correct writing the values 1=OFF / 2=LO / 3=MED / 4=MAX.
The Tested AC is the stock Asobo_A320_NEO , buttons assigned to Offset 0x2F80
12=97,8,x01002F80,x02 -{Num1: Press=offset byte set, offset 2F80 }-
14=98,8,x01002F80,x03 -{Num2: Press=offset byte set, offset 2F80 }-
16=99,8,x01002F80,x04 -{Num3: Press=offset byte set, offset 2F80 }-
18=96,8,x01002F80,x01 -{Num0: Press=offset byte set, offset 2F80 }-The logged values for Offset 0x2F80 are also as we know in sequence, OFF=1 / LO=2->0 / MED=3->0 / MAX=4->0.
@asessa if it does work correct with Mobiflight for you then the problem is somehow on their side but not within FSUIPC. Or I just see you use a different AC with an additional FBW program.
Thomas
-
Hi John,
for B747 the max AB value you set with value 6, shows correct in 0x2F80 but I didn't try setting it via 0x2F80. I used SET_AUTOBRAKE_CONTROL.
QuoteDo you think it worth adding another read-only offset to show the actual autobrake state (derived from0x2F80 but ignoring the second reset to zero) to handle this for the A320?
For Cockpit builders yes. But that would be only for Airbus.
Thomas
-
Hi John,
to set the AB the SET control should be used, that works also correct for B747 (0 to 6).
The Offset 0x2F80 shows as you found the sequence of value set and then back to zero.
QuoteWhen a param of 2,3 or 4 is sent, I can also see a second Set Autobrake Control being sent with a parameter of 0. Not sure where this is coming from at the moment,
This is because in Airbus you have Momentary Push Buttons, so the actual PUSH shows the correct value (2, 3, 4) but when released it goes back to zero. That is not wrong for Airbus, it is the correct design. What is missing is SimVar(s) for the indication LO / MED / MAX.
For B747 the Offset indicates correct in relation to switch position.
Thomas
-
Hi,
just to add in relation to FS9.
FS2004 (FS9) runs here with the same framerate and WITHOUT any micro stutters in windowed or Fullscreen (ALT+ENTER) mode, FSUIPC 3.999z9b installed or not, at 100 fps to 120 fps+.
On Windows 10, 2004 - 20180.1000. nVidia 457.30
Thomas
-
Hi,
PM sent.
Thomas
-
Hi,
FSUIPC7 does not run as part of MSFS as it was in previous FS/P3D versions. The "MSFS with FSUIPC7" icon runs a batch file that starts MSFS and after 2 minutes (120 seconds) when executed it will start FSUIPC7. As your video timing shows you stopped at around one minute, the time-delay to start FSUIPC7 hasn't reached.
You can change that time-delay as described in the "Installation and Registration Guide", page 4/5. But the standard timing setting of 120 seconds is well chosen.
QuoteThis contains an option, selected by default, to install a shortcut on your Desktop that will:
- First start MSFS, displaying a splash screen while MSFS is starting up
- after a delay of 2 minutes (120 seconds), to give time for MSFS to fire-up, FSUIPC7 will be started
Note that the delay can be changed by editing the file MSFSwithFSUIPC7.bat, located in your FSUIPC7
installation folder.
If you do not want to create such a link on your Desktop, uncheck the provided checkbox before clicking
Finish to end the installation process.Thomas
-
Hi,
QuoteAre you saying that FSUIPC7 is a side-by-side install with FSUIPC6? so basically, I can have both installed simultaneously?
clearly Yes. FSUIPC6 and earlier versions are DLL types and run within FS/P3D as part of it. FSUIPC7 is a separate application and does not run inside MSFS as part of it.
FSUIPC7 is compared to any earlier FSUIPC version an EXE stand alone application that doesn't run inside MSFS and as said it doesn't effect any other installation of FSUIPC.
But you cannot run multiple instances of FSUIPC at the same time, it means you cannot run your p3Dv4.x and at the same time FSUIPC7 as that would conflict and automatically not start (whichever starts second).
Thomas
-
Hi,
FSUIPC7 doesn't have any effect on any other FS/P3D installation with FSUIPC4/5/6. You can even copy your existing FSUIPC6.ini file over to the FSUIPC7 installation folder and rename it to FSUIPC7.ini, that makes your previous setup the same way work. The only current problem might be, depending on your setup, what is and what isn't working in SimConnect interface of MSFS. Same is true for Linda as it depends as well on what is and isn't working for MSFS.
Thomas
-
Hi,
AILERON TRIM LEFT/RIGHT don't work in SimConnect yet, Asobo will have to fix those like many others.
But AILERON TRIM SET works and so does RUDDER TRIM SET. Both can be assigned as an controller axis in Axis Assignment tab and calibrated in Joystick Calibration tab (P7). You can as well write to the control 66731 (AIL TRIM) or 66732 (RUD TRIM). When writing to the Controls a value please note that the value has to be within the trimmable aircraft range, most likely -10.0 to +10.0 degree. The value you write has to be the multiple of 10, -10.0 = -100 and +10.0 = 100.
Thomas
-
Hi,
Quotenot for both TBM930 and Longitude.
the control SET works for TBM930 as well but is immediately set back to zero (0), seems the panel light rotary overwrites that, , light comes ON and goes OFF and opposite as weel when ON and set to 0 it comes ON again. So clearly a Asobo failure in those Aircrafts.
Thomas
-
Hi,
without any information it is very tricky to guess.
Please send your current FSUIPC7.log file after you closed the session and FSUIPC7 process still stays open.
Thomas
-
Hi,
the both (PANEL_LIGHTS_ON and PANEL_LIGHTS_OFF) don't do anything via SimConnect, seems not supported yet by Asobo.
But you can use PANEL_LIGHTS_SET instead with value 1 for ON and 0 for OFF, checked with Asobo Baron G58 that has that switch.
Thomas
-
Hi,
those are only to set the Index, current value to the window, and not the value itself. At the moment those Set Value controls are not supported in MSFS via SimConnect. The working controls for those are only available via INC / DEC, i.e.
HEADING_BUG_INC or HEADING_BUG_IDEC Or you use the corresponding Offsets to set the values like07CC 2 Autopilot heading value, as degrees*65536/360Thomas -
Hi,
QuoteI've downloaded and installed FSUIPC7, also downloaded and bought a license for WideFS7. But I don't understand how to register the product. The installation guide mentions FSUIPC4, do I need to download and purchase version 4 first?
No need to buy a registration for FSUIPC4 at all.
If you download the latest installer for FSUIPC7 you also need to download the latest Beta FSUIPC7.key file, FSUIPC7 is not yet published but will be in the next couple days.
As you have already FSUIPC7 installed you should have as well the FSUIPC7.key file in the installation folder, valid up to 08.11.2020
You can just rerun the installer, after you placed the FSUIPC7.key file, and when you get to the registration window it will show you already this Be=ETA registration info. At that point you can enter your WideFS registration info. In case the Name & Email address are different than the FSUIPC7 registration you tic the box "Check if using a different Name or Address for WideFS" to enter exactly the WideFS information, best copy and paste.
For the first part, Elevator Trim, the solution is to use the reflecting Offset and set the value for your needs to increase or decrease. First you have to disable all defined buttons you want to use for Elevator trim in MSFS and FSUIPC.
Now go to FSUIPC Buttons tab and press your ELV Trim UP button and do the same thing as shown in the pic. The values used here are just an example. 20 is the decrease value, you might use a higher value to change faster/more i.e. 80. The value -8000 (negative 8000) is the max nose down trim I want, the max value is -16384 (negative 16384). You can limit with this the max used nose down trim. The pic is from FSUIPC6 but the Buttons tab is identical in FSUIPC7.
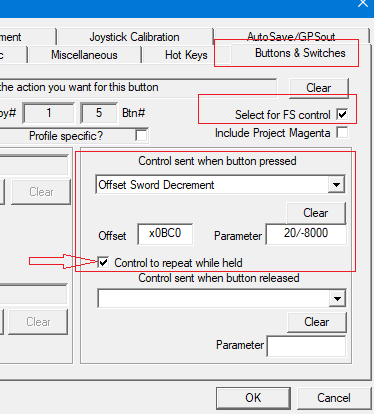
Now go to FSUIPC Buttons tab and press your ELV Trim DOWN button and do the same thing as shown in the pic. The values used here are just an example. 20 is the increase value, you might use a higher value to change faster/more i.e. 80. The value 8000 (positive 8000) is the max nose up trim I want, the max value is 16384 (positive16384). You can limit with this the max used nose up trim. The pic is from FSUIPC6 but the Buttons tab is identical in FSUIPC7.

Thomas
-
Hi,
as you might have noticed the FSUIPC7.key file shows it is valid up to 31.10.2020 and we are slightly beyond 😏
Just use the FSUIPC7.key file that is valid up to 08.11.2020 instead, download link is included below.
Thomas
-
Hi,
the answer is already within your question!
Quotean unexpected and not programmed event to occurred, e.g. for button 1 the view changes
Typically button 1 for any controller is in FSX standard for View change like Key "S". In your case the "unexpected" behavior is because you didn't untick the box "Enable Controllers" in FSX, “SETTINGS\Controls\Calibration\Controller”. So FSX uses in addition the standard layout for any controller connected, as long you didn't remove any associated definition in FSX.
Thomas
-
Hi,
are you using FSUIPC5.15 and not the latest? If so please download latest FSUIPC5.157 first and try as there have been changes for PMDG updates
FSUIPC 5.157
for Prepar3D Version 4 [ONLY]Thomas
-
Hi,
your last pic shows that you have FSUIPC7.exe as well on the desktop, WHY?? If you start that EXE then the LOG and INI file is of course placed in the same location. As the Key file is in a different location FSUIPC7 runs as not registered.
Remove the files from desktop and uninstall FSUIPC7. Make sure the installation folder is empty and all referenced FSUIPC7 start icons are deleted. Then do a new installation but make also sure you don't install from the ZIP file, it should be in any case unzipped in a different folder.
Thomas
-
Hi,
just use the latest installer
Then run the installer, have Key file selected and when it ask to register press "Skip". This will place the latest Key file and works correct.
Thomas
-
Hi,
just use the latest installer
Then run the installer, have Key file selected and when it ask to register press "Skip". This will place the latest Key file and works correct.
Thomas
-
Hi,
please read John's reply in this thread, two above.
Thomas
-
Hi,
the controls are there as before.
Thomas
-
Hi,
just open the FSUIPC7.ini file and delete the profile section for that AC. The location of the FSUIPC7.ini file is the folder you installed FSUIPC7 in.
Thomas
FSUIPC does not appear in the FSX menu
in FSUIPC Support Pete Dowson Modules
Posted
Hi,
make sure you install SP1 and SP2 for FSX with later SimConnect.
From FlightSim.com
or via Microsoft (only SP2)
Thomas